Saturday 8 August 2020

Pugnant. Mordent.

Separated from the bulk of the Imperium by the Great Rift, the Sectorum Ludus Bellorum is a region of space where it is rare to find anything new. The best connected factions may have heard tell of such things as Primaris Space Marines and the return of Primarchs, but only as whispered rumor and idle speculation. The few remaining bastions of Imperial rule have all but given up on ever being reinforced, but every so often, a glimmer of hope finds its way into the Sectorum. 

Tau surveillance drones uncovered footage of what appears to be a group of Space Marines in a new kind of armour battling cultists of the Birds of Paradise Slaanesh Cult. Some of these images found their way into the hands of a local Rogue Trader and from there made their way slowly across the Sectorum.

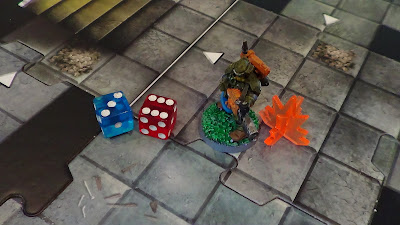
 Under attack by foul cultists, these unknown marines make a stand at a supply dump. 

 The livery on the Marines would seem to indicate that they belong to the semi-heretical Space Sharks Chapter. 


 These Marines are armed with weapons never seen in the Sectorum before. 


The mysterious Space Sharks are known for appearing from nowhere to aid the servants of the Emperor, could this be an example of that legend, or something more? Has someone found a way to cross the Great Rift and what does this mean for the future of the Sectorum? Only time will tell. 
 

Monday 11 May 2020

In the lair of the Mutants - Part II

After the first game, I was pretty keen to give my solo system another go, tweaking a couple of things before I dove in again. Last game, the "Monster Mechanic" worked fine, so that remained unchanged, but I wanted to add more objectives to the overall scenario, to give the option of Degrees of Success/Failure. Given that Ordo Chronos Inquisitor Kang was taken out by a Scavvie in the last game, I decided that he had been captured and a team was being sent in to either rescue him or make sure the Mutant Psyker didn't get its hands on Kang's Force Stave. This time, taking out the Mutant Psyker would be a tertiary objective, after rescue and recovery. 


To this end, I went through my D&D dungeon tiles, pulling out something that approximated a gaol cell and a couple of "exits". Each of these was shuffled into a pile of 9 other tiles, so that for every ten or so tiles I explored, one would be revealed. When the "Vault" tile would be revealed in-game, Inquisitor Kang would be inside and enter the game once freed; because he had been captured, although Kang would join my Kill Team, he would be unarmed and begin with a Flesh Wound. Getting Kang to an Exit would be my major Victory Condition for the game. 


In my mind, the team being sent in after Inquisitor Kang would have been scrambled pretty quickly, so nothing too crazy, but perhaps an Ace in the hole? The remaining Karskins would be joining Lance Corporal Cloud for the next mission, Sergeant Storm will be leading, with Lance Corporal Clay toting a Grenade Launcher and Privates Heath and Glanzman issued with Hot-Shot Lasguns. To add a bit of needed punch, one of Inquisitor Kang's personal retainers, M'Baku, the Man-Ork, an Imperial Guard Ork Hunter Veteran, would join the Karskins. Rules-wise, M'Baku is an Ork Nob with Big Choppa, and obviously my Combat Specialist. This Kill Team comes in at 81 points, meaning I'm a bit more even against the Scavvies than last time. 


For this battle report, I'll just be covering the major events of the game and talking about what I'm doing. I had my models set up and ready to go, drawing cards that would help me with Close Combat and Psykers, not an ideal start, but I'd learned lessons from my first defeat and was ready to purge the mutants in the name of the Emperor! 


Entering the dark catacombs, Sergeant Storm was nervous, and with good reason; he'd lost several good men on the last mission and Lance Corporal Cloud was visibly shaking at being back in the lair of the mutants. The presence of M'Baku was at once reassuring and unnerving, as the massive veteran could clearly hold his own in a fight, but his affectations of Orkish habits and weapons were uncomfortable reminders of past campaigns. Setting the expression on his face to one of grim determination, SGT Storm gave the order to push forward into the grim, dark catacombs. 


The first Scavvie to be found is quickly burned to a crisp by LCP Storm, who, by now, has become a veteran mutant hunter. Learning from the mistakes I made in the first game, I opt to stay clumped up so that my team can support each-other and to not explore too far out too quickly.


PVT Glanzman ruins this plan in my second action, by finding a Large Chamber containing a Big Mutant, Scavvie Boss and Scavvie. Knowing that the Big Mutant is the major threat, I elect to have Glanzman fire at it and risk losing him in the return fire from the Boss and Scavvie. 


I luck out and wound twice with Glanzman's Hot-Shot Lasgun, dealing a Flesh Wound to the Big Mutant, but he still gets his turn and charges for the nearest target, M'Baku. Although I don't want to risk losing my Combat Specialist so soon in the game, M'Baku has two Wounds and a 4+ Save, so he's probably the best possibility to survive a charge from the Big Mutant. 


Again, I get lucky, M'Baku emerges with only a Flesh Wound, even after all four of the Mutant's Attacks hit. Even though M'Baku is a major close combat asset, I decide to charge in SGT Storm as my next action instead, as his Power Fist is more likely to Wound and does more Damage, increasing the odds of taking the beast down. 


My luck is with me a lot more in this game, and SGT Storm's attack gets the desired result. Also, despite weathering two turns of shotgun fire from the Boss and Scavvie, PVT Glanzman has remained unscathed, but I know my luck won't hold out and I need to back him up. 


LCP Clay brings up his Grenade Launcher, which gets D6 shots, again, I'm playing the odds. Once again, I score a Flesh Wound, getting one in return when the Scavvie Boss shoots back. 


With a new turn, I decide to clean up my mess with the tried-and-true Imperial method, purging with fire! LCP Cloud once again proves his worth, tempting me to scrounge eBay for more Karskins with Flamers. Pretty sure I can run up to four in a Kill Team.


The unlucky Scavvie who has missed every 3+ shot for four turns in a row finally clips Glanzman, dealing a Flesh Wound. 


Glanzman returns fire and I finally have a Scavvoe-free board. Doing some rough math in my head; I've revealed 4 tiles, so one of the next 6 has to be the cell holding Inquisitor Kang. Ideally, I'd like to avoid getting too spread out or trapped in a narrow corridor with a Big Mutant, so I elect to explore the edges closest to the entrance first. 


Working together, SGT Storm and M'Baku head Map-North, uncovering another Scavvie, who is quickly dispatched by M'Baku's Big Choppa. 


Keeping nearby, Glanzman uncovers another Scavvie, but fails to take it out in the first shot. Here I took advantage of the vagaries of my own rules, as the Scavvie Monster Card states that a Scavvie will shoot at the closest target, regardless of the viability of the shot. With SGT Storm behind the corner, as shown here, he is technically the closest target, but is both Obscured and In Cover, making the shot pretty difficult. In a real game of Kill Team, if I were playing the Scavvie, I'd shoot at Glanzman, who is a clear target and, due to his Flesh Wound, requires only a 3+ injury roll to remove from play. 


In the end, it doesn't matter too much as I'm forced to bring up LCP Cloud and, once again, solve all of my problems with fire. 


I take a moment to take stock of where I'm at. I've been lucky to not lose anyone so far, and should be close to Inquisitor Kang and, thereby, my primary objective. It was at this stage that I started to lose the game; not due to any dice rolling or bad moves, but I got too confident and started to over-extend my forces. 


The very next room I found was Kang's cell, thanks to a Large Chamber tile revealing two tiles at once. PVT Heath is now facing down two Scavvies, but I'm still pretty confident, right up until Heath misses both shots at 2+. 


The game is now turning, though at the time I hadn't quite realised it, with the Scavvies gunning down Heath with a handful of 6s. 


Seeing my primary objective so close, I pull out all the stops to remove the two Scavvies in my way. I charge M'Baku in, playing the "Slam" card to give me a 1-in-6 chance of causing a Mortal Wound on top of the four Attacks I would be getting. Of course, I rolled a handful of 1s and 2s. 


I want these Scavvies dead, so I also Charge SGT Storm in, who at least deals some damage with his Power Fist, but I'm still disappointed that all the dice I've rolled have turned up so little this turn. 


Still somehow pretty confident, I decide to have LCP Storm explore a little more, hoping to luck out and hit the Mutant Psyker sooner rather than later and clean-sweep all of my objectives. Naturally, the first enemy I hit is a Big Mutant and Cloud's Flamer fails to do any damage. 


The return attack of the Big Mutant brings LCP Cloud's heroic run to an end, and a big gap in the rear of my forces. Now I'll have to get Kang out past the Big Mutant, which I don't like my chances of doing. 


Things rapidly go from bad to worse as the Scavvie guarding Kang's cell is able to take out SGT Storm with a swing from the butt of his shotgun. As the turn ends, I'm forced to make a Break test. 


And I fail. Once again, the might of the Imperium is no match for a rabble of mutants. As losing SGT Storm was kind of the tipping-point, I'm not sure how much better I would have gone if Cloud hadn't risked exploring, but, once again, it was a close game. The COVID-19 lock-down eases to the point where I could get a Kill Team game in at a friend's house tonight in Victoria, Australia, but I have one more game idea for this solo-play set, so you'll probably see that at some point as well. 

Wednesday 22 April 2020

In the lair of the Mutants - Part I

Like many, I'm not getting out much these days and haven't wargamed in a while, so I thought I'd give this "solo gaming" thing a go. Although I've played a few solo board games and much prefer my video games single-player, I've never been terribly tempted to solo wargame, as many of the ones I've seen are rather labor-intensive for comparatively little game-play. So my brief was to be set-up and running without too many additional materials, using miniatures and rules I already had to hand. As I've been pulling apart and modifying Kill Team for over two years now, that seemed like a natural fit, I had a few warbands, and plenty of "antagonists" with Scavvies, Ur-Ghuls and Chaos Cultists. With the Narrative Kill Team deck of cards, I could keep some randomness in the game, even if I knew what both teams were likely to do at any time. 

Rather than build my own solo play "engine", I borrowed heavily from the Dungeons & Dragons board games, of which I own several, which are designed for solo or cooperative against mechanics-run monsters. As I'd decided on Scavvies for the first game (they were painted and fairly easy opponents), I had to select how many I'd be fighting and how they'd react. I settled on 8 Scavvies (Genestealer Cult Neophyte Hybrids), two Scavvie Bosses (Neophyte Alphas), two Big Mutants (Aberrants) and a Mutant Psyker (Magus). The mission, to keep things simple, would be to kill the Psyker, who could deal a bit of damage with his Psybolt power, but was rather fragile otherwise. Keeping in mind that Scavvies are a pretty superstitious and cowardly lot, I knocked up some "mechanics" cards for them like the ones in the D&D Board Games. 


As to how the Scavvies would appear, I borrowed again from the D&D games, which draw a random monster from the deck, place it on a newly flipped tile and each monster acts after each hero. Pretty easy really, so long as I took some care with the set-up, see below. Given that Scavvies are pretty flimsy for the most part, I made up a "Monster Deck" of 8 Scavvies, 2 Bosses, 2 Big Mutants and 1 Magus. For those interested, this worked out to around 112 points


With the antagonists sorted, I wanted to pick out some "good guys" that would be fun to play. I settled on Astra Militarum Tempestus Scions, because I have a nice set of metal Karskins that don't get enough play, and they have a nice balance of power and durability. I threw in a Hot-Shot Volley Gun and a Flamer for a little more punch. To add a bit of character, I included Inquisitor Kang of the Ordo Chronos (Grey Knight Justicar), who's 3+ Save and Psybolt would help provide some durability to the team. This totaled around 65 points, meaning I'd be up against it, but, as I'd be unlikely to be taking on more than one or two antagonists at a time, it should work out. 


To get the "monster deck" ready, I took out the Mutant Psyker, 1 Scavvie, 1 Scavvie Boss and 1 Big Mutant; I shuffled this "mini-deck", then shuffled the other cards and placed them on top. This was done to ensure that the Psyker would appear at the end of the game, but I wouldn't know exactly when, but also made the possibility of running into too many tough opponents at the beginning of the game unlikely. 


Next, I sorted out a stack of my D&D Dungeon tiles, perhaps a quarter of what I have in total, making sure there wasn't anything that would clash with the 40k miniatures, like some of the monster-specific tiles that come with some of the games, or extra mechanics like doors and exits. I made sure to keep a couple that would have fun effects, like placing an extra tile, just to keep the game unpredictable wherever possible. I shuffled the tiles as well and everything was ready to go. 


Deep in the catacombs of Bakunin XII, an infestation of mutants had made a discovery; a device from the Dark Age of Technology that amplified psychic powers. Due to the sparse and isolated nature of the Sectorum Ludus Bellorum, Inquisitor Kang of the Ordo Chronos was the first to hear of the dangerous mutant psyker. With no choice but to end the threat himself, Kang gathered some elite Stormtroopers and departed for Bakunin XII. 


For the first turn, I'll give a blow-by-blow summary of what's happening, in case you want to do something similar yourself, then I'll be doing more of a typical AAR. I started by drawing two cards from the deck, and I immediatly noticed that many of my cards wouldn't work for this altered version of the game. I decided to continue as I was, but I think normal Command Points would have worked better, even with the altered turn order. 


Private Kubert, armed with Hot-Shot Lasgun, moves up to the edge of the Start Tile, he then "explores" the next tile. I draw a tile from the stack and place it so that the arrow is pointing towards my character. 


Now that I have a new tile, there are a couple of things to note. First, the corridors have a habit of winding off the edge of the table, so the game can need to be shuffled around occasionally. The pile of skulls (alternatively a scorched patch on other tiles) is where the "monster" will be placed. 


I flipped the first monster card and got a Scavvie. I placed a Scavvie from my collection (an old Judge Dredd mini with a shotgun) and put the Kill Team Stat Card I had nearby for reference. Technically, it was still Private Kubert's turn, so I decided to take a shot at the Scavvie before it blasted away with its shotgun. 


Kubert has a Ballistic Skill of 3+, so this roll is a bad miss. With nothing else to do, my turn passes to the Scavvie. 


Also with a BS of 3+, the Scavvie delivers a much better hit. At such close range, the Shotgun gets +1 Strength, meaning the Scavvie now only needs a roll of 3+ to wound Kubert. 


With another great roll, the Scavvie wounds with both shots. As there is no AP on the Shotgun, Kubert gets his full save of 4+. 


I save one wound, but I'm not keen on taking the risk on losing one of my five heroes on the first turn, so I play a card from my hand. 


The Lucky Card gives me another 5+ save, which I make, ending the Attack Sequence and the Scavvie's turn. Given that the Scavvie will get another turn after my next one, and he almost took out Kubert the first time, I decide to bring up Lance Corporal Cloud, armed with a Flamer, to clear out the enemy. Flamers get to automatically hit and get D6 shots per turn, so I was hoping for a big number. 


A roll of 2 isn't great, but at least I get two wound rolls against the unharmed Scavvie. 


Only one successful wound (I needed a 3+) doesn't seem great, but I would only get one injury roll anyway, so not really a loss. The Savvie gets to make a saving throw, needing a 5+ to ignore the results of the wound. 


Thankfully, the Scavvie fails the save, meaning I get to make my injury roll. 


With a roll of 4+, the Scavvie is Out of Action, leaving me to take my next turn. I choose to bring up Private Kanigher, another Stormtrooper armed with a Hot-Shot Lasgun. 


Once again, the monster card flipped reveals a Scavvie. Kanigher fires with his Lasgun, hoping for better luck than Kubert. 


As the Stormtroopers have a 3+ BS, that's a hit, but my run of luck with the heroes' rolls stays steady. 


Kanigher makes the Wound roll as well. As the Hot-Shot Lasguns have a -2 AP, the Scavvie doesn't get his save of 5+, so I move straight on to the injury roll. 


The Scavvie takes a Flesh Wound, which reduces both its BS and WS by -1, this means the return fire misses and Kanigher is safe. 


Inquisitor Kang is next to move, opening up another section and revealing a Big Mutant, a much tougher opponent. 


This is all going to plan, however, as Kang is a Psyker, so gets to use his power and his weapon in the same turn. The Psybolt power requires a roll of 5+ on 2D6 to use, but I roll a total of 10, meaning the power does D3 Mortal Wounds rather than the regular 1 Mortal Wound. 


With a D3 roll of 3, the Mutant is reduced to 0 Wounds instantly, and the Injury Roll turns up an Out Of Action result, meaning the threat is ended before it began. Lucky. 


With his Shooting Phase still to happen, Kang uses his Storm Bolter to fire at the remaining Scavvie, hitting twice thanks to his excellent BS. 


Despite the power of the Inquisitor's weapons, however, only 1 Wound is successful. 


Needing a 5+, the Scavvie makes it's save, surviving another turn. As Kanigher is still the closest target, the Scavvie fires its shotgun at him again. 


With a Flesh Wound, the Scavvie needs a 5+ to hit, which it manages on one die. 


The Shotgun gets +1 Strength at close range, meaning the Scavvie needs only a 3+ to Wound Kanigher, which it gets. Thankfully, Kanigher has a 4+ save, so his armour protects him. 


At this point, I'm sick of this one Scavvie, so I decide to move up my last character, Lance Corporal Mackey with the devastating Hot-Shot Volley Gun. The Volley Gun has 4 shots, but is a Heavy Weapon, so suffers a -1 to hit after moving (Mackey is a Heavy Specialist). Two shots hit, which should be enough at Strength 4. 


With a roll of snake eyes however, the Scavvie lives to vex me another turn. Now that Mackey is the closest model to the hero, he will be the target of the Scavvie's next attack. 


Naturally, I roll boxcars for the Scavvie, and Mackey has been hit twice by the shotgun blast. 


Again needing a 3+ to wound, the Scavvie succeeds once. When rolling my save, however, Mackey fails and the wound goes through. 


The injury roll is a 4+, meaning Mackey is removed from play. Thus my turn ends with a Scavvie still menacing me and one man down. For the rest of the report, I'll be moving away from covering every roll and move and only discussing major events of the game. 


As a new turn starts, I draw two more cards, Jump Pack is pretty useless in this scenario, as I won't be likely to fall anywhere, but Slam and Auspex may be handy down the track. 


Sick of the, incredibly lucky, Scavvie menacing me, I start by activating Kanigher and blasting it for the third time. Thankfully, this time the mutant menace doesn't survive. 


Exploring a little more, Private Kubert finds another Scavvie but is unable to stop it. Thankfully, the return fire is also ineffective. Inquisitor Kang also finds a Scavvie, though with his Psybolt power and Storm Bolter, the mighty member of the Ordo Chronos clears the field for his team. 


Lance Corporal Cloud pushes forward with his Flamer, finding yet another Scavvie with a Shotgun. The Scavvie survives a blast from the Flamer with only a Flesh Wound and returns the favour, leaving Cloud vulnerable. 


Not wanting to leave a Scavvie around to finish off another Stormtrooper, Kang charges in, playing the Slam card. Sadly, both the Slam and Kang's attack with his Nemesis Warding Stave fail and the Scavvie is left alive to retaliate. 


Kanigher explores to reveal the "Long Corridor" tile, finding a Scavvie Boss and a Scavvie down the passageway he's revealed. A quick blast from Kanigher's Hot-Shot Lasgun takes down the Boss, and the return Autogun fire from the remaining Scavvie pings off the corner Kanigher is sheltering behind. 


With another shockingly good role, the Scavvie with two flesh wounds and no close combat weapons manages to bypass the Power Armour of the Inquisitor and Kang is taken out of the game. 


Knowing that the mission is still achievable, Lance Corporal Cloud pushes forward, letting Kubert and Kanigher take care of the badly wounded Scavvie behind him, Cloud scorches another Scavvie away with his flamer. 


Making use of the Auspex card to ignore the Scavvie's Cover Bonus, Kanigher blasts the mutant away before it can become trouble. 


Cloud and Kubert push down the winding corridor, leapfrogging fire to keep the Scavvies at bay. 


When Kanigher explores forward, the second massive Big Mutant is revealed. Kanigher's Lasgun fire bounces off the beast's thick hide and the retaliating charge results in Kanigher being crushed by smashing blows. 


Now making Will to Fight checks each turn to stay in the game, the remaining two Stormtroopers are up against a tough fight. I play the Battle Brothers card to have both remaining Troopers shoot at the same time and the Corroded Armour card so that the shots automatically wound. As Cloud's Flamer automatically hits, this means I get D6 free injury rolls on the Big Mutant. 


The free rolls are not enough to bring the monster down however, dealing only a Flesh Wound. Kubert is the next to fall as the Mutant charges. With it's Consolidate, the Big Mutant is now only 2" from Cloud; things are looking grim. 


Although a retreat seems like a great idea right now, Cloud makes his Leadership roll and I'm sticking around for at least one more turn. With the card Difficult Terrain in my hand, I know I can prevent the Big Mutant from reaching with a Charge (the card shortens an enemy model's movement), so Cloud withdraws far enough to still get a shot in with his Flamer. Sadly, the weapon again fails to take down the massive Mutant beast. 


Thankfully, with the Big Mutant attempting a charge, and failing due to the Difficult Terrain card, Cloud can make an Overwatch shot, which finally burns the enemy away. 


With only two Monster Cards left to draw, I'm thinking maybe Cloud can claim a solo victory, but my Will to Fight Check fails and the game ends with the last surviving member of my team fleeing for his life. Probably for the best, as the Mutant Psyker card was the last in the deck and it would have taken some pretty lucky rolling to pull out a win. 


All-in, I felt the game ran pretty well, coming pretty close at the end, and that was with much better rolling for the Scavvies than the heroes. With some minor tweaks, I'm looking at play a second game soon, following on from the events of this one.